Tutorial: How To Install Fiberglass Blades in Foot Pockets
Posted by MAKO Spearguns on Jan 12th 2023
Install fiberglass blades in dive fin foot pockets with these simple steps
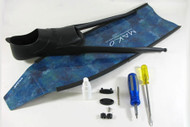
What you will need:
- A) Food grade silicone (optional but recommended)
- B) Drill and drill bit
- C) Phillips screwdriver
- D) Flat head screwdriver
- E) Blades
- F) Foot pockets
- G) Foot pockets hardware

STEP 1
Before installing blades in your foot pockets, it is best to warm up the foot pockets first. Then, place the blade in the first foot pocket and line up the foot pocket "arms" so they are at equal distance to the end of the blades. This ensures the blades are installed evenly into the foot pockets.
NOTE: It is best to line up the end of the arms so they meet approximately 3/16 of an inch below the point where the high profile fin rail starts. Once the arms are installed on the blade, the end of the arms should meet the starting point of the high profile rails. If, after installation, the arms extend slightly beyond the high profile rail, it is O.K. to trim a little of the high profile rail down so it will fit in the T shaped cavity of the foot pocket arm.


STEP 2
Once the blades are lined up center in the foot pockets, drill the required holes and install the hardware. Be careful not to accidentally move the positioning of the blade before drilling the holes because this will make the fins uneven.

STEP 3
After drilling the holes, install the top receiving plate in the top side of the foot pocket.


STEP 4
Place the bottom side plate on the bottom side of the blades, with the thick side of the plate facing the end of the blades and the thin side of the plate facing the foot pockets.


STEP 5
Install the screws while applying pressure to the top side receiving plate so the screws will not push the top side receiving plate out of the cavity. Notice my fingers on my left hand are under the fin, pushing upwards on the top side receiving plate while I am installing the screws.

STEP 6
Apply a liberal amount of food grade silicone to the entire length of the first low profile fin rail. This will make the installation process very easy.

STEP 7
Bend the foot pocket arm back to increase the size of the opening in the foot pocket arm and press the foot pocket arm while moving back and forth onto the fin rails. Continue this process until there is 3 or 4 inches of foot pocket arm left to be installed.


STEP 8
To install the remaining 3 or 4 inches of foot pocket arm onto the fin rail, spray some food grade silicone onto a flathead screwdriver and insert the screwdriver a few inches into the foot pocket arm cavity. Then, use the leverage provided by the screwdriver to continue the installation process. As more of the foot pocket arm is installed on the rail, back out the screw driver and repeat process until fully installed.
NOTE: Inside the arms of the foot pockets is a T shaped cavity which mirrors the T shape profile of the low profile fin rails. After installation, the foot pocket arms should be flush with the fin rail. If you see a lump in the foot pocket arm, that means that the fin rail is not properly seated into the T shaped cavity. If this is the case, remove the foot pocket arm and start over.


STEP 9
Repeat the process by installing the other foot pocket arm onto the fin rail.
STEP 10
Install the retaining clips. This is actually a 2 step process so we will break this up in two sections.
NOTE: THE RETAINING CLIPS ARE FORWARD / REAR FACING SENSITIVE.
You will need a flat head screwdriver and some technique for this process. Catch the opening of the clip on the groove of the foot pocket while placing the flat head screwdriver in the slit under the clip. Pressing hard and STRAIGHT DOWN on the clip will expand the opening. Continue to press downward (NOT WRAPPING IT AROUND YET).

STEP 11
Only after the clip flattened out slightly BY PRESSING SRAIGHT DOWN can you begin the process of wrapping it around the arm with the flathead screwdriver. Once it is wrapped around, remove the screwdriver and you will feel it snap into place.
NOTE: If you try pressing while wrapping the clip around the arm at the same time, it will be a bit more difficult.


